It's so easy, a you can do it! Hello, everyone! Welcome to the first ever C2Develop tutorial to ever be created! Yay! Okay, so todays topic is Creating a Map Editor. The way we do these tutorials is by first outlining what it our end goal is in detail, detailing which plugins and behaviors we're going to be using, and explaining how each part works together; afterwords, we will start on making it happen. As you can see, there will be a link at the top for the example download, right under the ratings bar. Feel free to do what you will with both the example and this blog post, because they are both released under the Public Domain license, which makes them completely free and open for use in any form. So, let's get started, shall we? Organization: You can choose to organize however you'd like, but this is how my projects are organized (this will help you in navigating the examples I upload):
Goal: The Goal of this project is to make an intelligent interface for the players to build inside of. Later we're going to start building a top down RPG in the style of Legend of Zelda using the multiplayer plugin to connect players. For now though, we're going to focus primarily on the interface of the Map Editor. We will start with creating a sort of outline to work with so that we can easily start working on making everything work together. Plugins: Constructing (hah) this project requires expert knowledge of the use of all of these objects. If you're not sure how to use some of these, you will have to consult the Tutorial section of the Scirra website. I will not be including each tutorial here, but you can easily find each one yourself: https://www.scirra.com/tutorials/top
How: Later we're going to making more complicated objects, like NPC's, enemies, signs, etc. For now though, we're only going to make the character and tilemaps needed to move around in the world. When the player is in the Map Editor, we will store the changes they make in local storage via JSON. We will then use the Array object to allow the player to package it as a save file. This can be shared via Multiplayer, but we will get to that later. MapSections are where the player will create objects and tiles. These will be containers of tilemaps and sprites that will be saved via Local Storage. We will use what we will call a PID (Positional based Identifier) as the identifier for the MapSection. We do this because we will want to spawn these in the game based of the position of the player, so we will just use the position to identify that space when we save and load. Doing this will greatly decrease save and load times. Make it Happen: Before we begin, you will have to make a new project. Go with a blank-ish template. You choose the appearance of your game, including viewport size, but I will be setting mine to 320 by 240. Just make sure you have the plugins required to follow the tutorial. If you'd like you can just grab the template when it's complete, that's up to you. Okay, so to start off, add a sprite. Set the size of that sprite to 32x32 if you don't already have a specific character size in mind. Name this sprite to MASK_PLAYER (mine will be names GAME_MASK_OVERWORLD_PLAYER). Create a family and add this object, and call that FAM_OVERWORLDOBJ and add an instance variable string called PID. This will be our player mask. You can organize however you'd like, just keep my organization methods in mind when looking at the example project. Create a Tilemap and set that to the size of the screen. Call this TILE_OVERWORLD (GAME_TILE_OVERWORLD). Add an instance variable string PID. Use any tiles you'd like. I'm going to be using a tilemap I've made myself for the sake of this example and you can use it too. Just make sure that if you do use my tileset that you credit me, because that is licensed under the CC-BY 3.0 license, which requires credit to be distributed. (But don't worry, I won't whine if you don't). Anyways, here's the link to that: http://opengameart.org/content/200-tileset-legend-of-pocket-monsters. Create another tilemap and name it TILE_MAT (GAME_TILE_MAT). Add the PID instance variable string. Make only one tile right now, set to size 16x16 or 32x32, and color it black. This will act as a wall, or otherwise, a blocking volume. We name it MAT as an abbreviation for Material. This tilemap will act as the holder for the surface of the visible tilemap object. If we were to make water the player can swim in, we'd add another tile and color it blue. We will program each tile individually for interacting with the player, but keep them all inside this one tilemap to simplify things. Next, create a Tiled Background. Name this object TOOL_MAPSECTION (EDITOR_TOOL_MAPSECTION). Add a PID instance variable string to this as well. You can think of this as the "holder" of the Tilemap and Sprite objects that will be created on top of it, because the PID's of the Tilemap and Sprite objects will be set to the PID of the MapSection and then saved within local storage based on that value. Okay, now just make sure you have the other objects we need. The objects we need are listed above. Now, we should have a blank Event Sheet. If you don't, add one. Name this event sheet "Editor Events". Here will will include the other events that we create for the Editor. We will split each sheet off by functionality so that we can find what we need easily. Now, add a folder for the Editor Events. We name these the same so it's easy to navigate. Within the Editor Events, add these sheets:
Add another event sheet, call this Game Events. Add a folder for Game Events and add these event sheets:
Now that we have our Event sheets, let's get programming! So, the first thing we have to do is go to our Build Filesystem event sheet. Here, create a group called "BUILD_FILE_FUNC". We will put basic Local Storage associated Functions within this group. This will include saving and loading of map information. Next, inside of the "BUILD_FILE_FUNC" group, add these placeholder Functions:
The SAVEMAP and LOADMAP functions refer to the name, description, etc. information of the map. This also includes the PID's that exist within the map. If a MapSection is never edited, or is empty, it will never get saved. We store all the existing PID's within the base MAP save. Okay, now let's start with the way we're going to be saving MapSection information. Our function for this is going to have four important parameters. The first parameter is going to be the PID, which we will get to later. Basically, this will be ("MapSection.X" & "," "MapSection.Y") As said before, this refers to the actual position of the Map Section. The second parameter is the JSON value of the FAM_OVERWORLDOBJ family and the third and fourth will be the JSON values of our visible tilemap and material tilemap respectively. The way we're going to pass this information to LocalStorage is by splitting each part of the map information by their grouping. The Map title would be saved under the key "MAP_TITLE". The sections of the map that we would need to load would go under "MAP_SECTIONS". The Sprite objects that we save would go within "MAP_SECTIONS_OBJ". Similarly, the visible tilemap and material tilemap would go within "MAP_SECTIONS_TILE" and "MAP_SECTIONS_MAT" respectively. So, right now we're just going to focus on crafting our save functions. So, go to your "BUILD_FILE_SAVEMS" function and add an action: Local Storage > Set Key("MAP_SECTIONS_OBJ" & "_" & Function.Param(0), FAM_OVERWORLDOBJ.AsJSON) You can see that at the end of "MAP_SECTIONS_OBJ", the PID passed through the first function param is added. Later on we will tell the game to look through the save data for the values associated with that position. When the player overlaps the area of the MapSection associated with the PID, the JSON for the objects within that area will load. Because we are going to save the information of the objects close to the scroll position (which we will work on later), everything within a certain proximity will be loaded. Go ahead and do the same thing for the visible Tilemap and material Tilemap, but supplement "OBJ" with "TILE" and "MAT" respectively, and change the object to save asJson to the tilemap objects. Your event sheet should now look a bit like this: 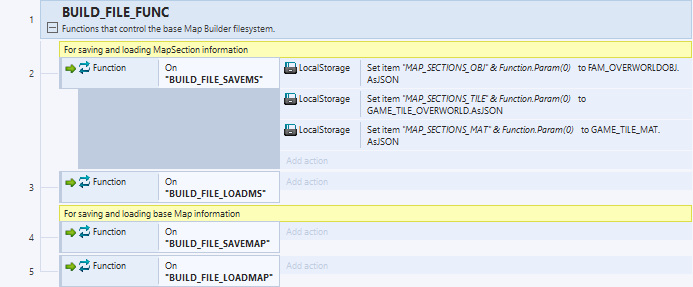 This will be a good place to stop for now. We will work on saving and loading more map information later, but the next thing we have to do is set up the creation of objects and tiles on screen, which is going to require the creation of GUI elements. Next The next thing we're going to work on is going to be making the UI and using it to create sprites and tiles in the map editor. Until next time!
0 Comments
|
ArchivesCategories |
 RSS Feed
